A computer script is essentially a sequence of instructions (commands) that the computer executes, making it an excellent tool for automating repetitive tasks. Scripts are highly scalable and versatile.
Because scripts can be deployed to user devices through Device Management solutions (such as Applivery), they are invaluable for IT teams. They enable you to perform complex tasks quickly, accurately, and effortlessly:
- Quickly: By using scripts alongside mobile Device Management, you can automate tedious processes. For example, you can access a computer program on 100 company devices with zero clicks instead of doing it manually 100 times.
- Accurately: A well-written script will consistently execute the same defined action every time, reducing the risk of errors that might occur if a human administrator were to perform the task manually, which can lead to inconsistencies and confusion.
- Easily: You can achieve complex and detailed tasks by breaking them down into smaller, manageable scripts, making the overall process much simpler.
Step 1 - Create your first script #
Go to the Applivery Dashboard and navigate to Device Management > Assets (1), then navigate to the Scripts (2) section and click on + Create Script (3).
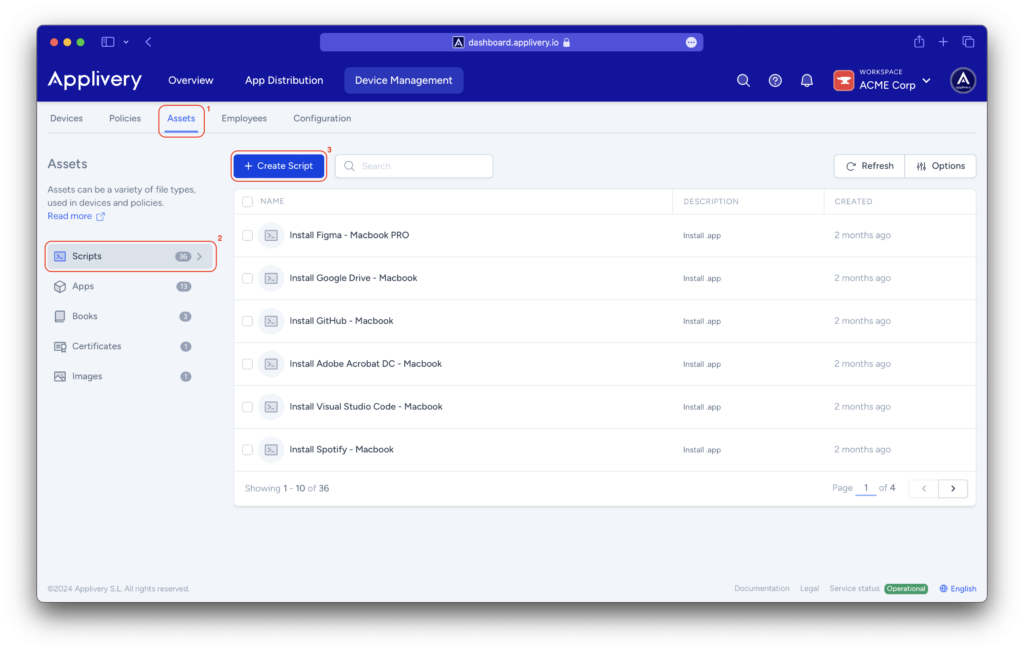
A code editor will appear on the screen.
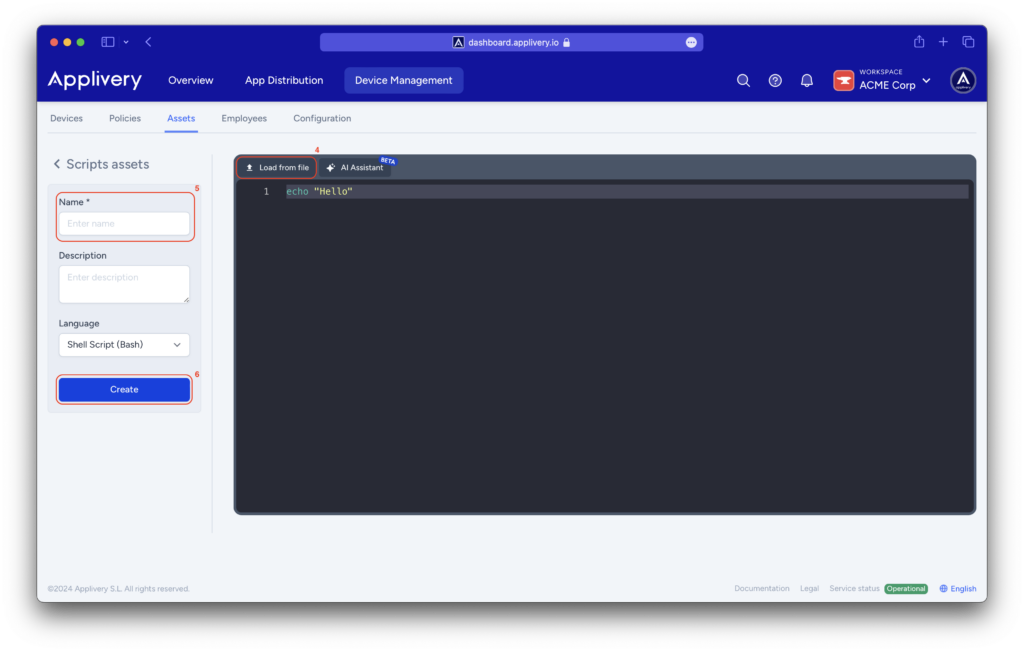
Inside the editor, you can either create a new script or upload an existing one from your device. This flexibility makes it easy to customize your scripts to your needs.
To create a new script, use the interface options and start typing.
To upload an existing script, click Load from file (4) in the editor, choose your script file, and it will be ready to use.
Finally, you must assign it a Name (5) (and optionally, a description), and click on Create (6).
Step 2 - Assign Scripts to your devices #
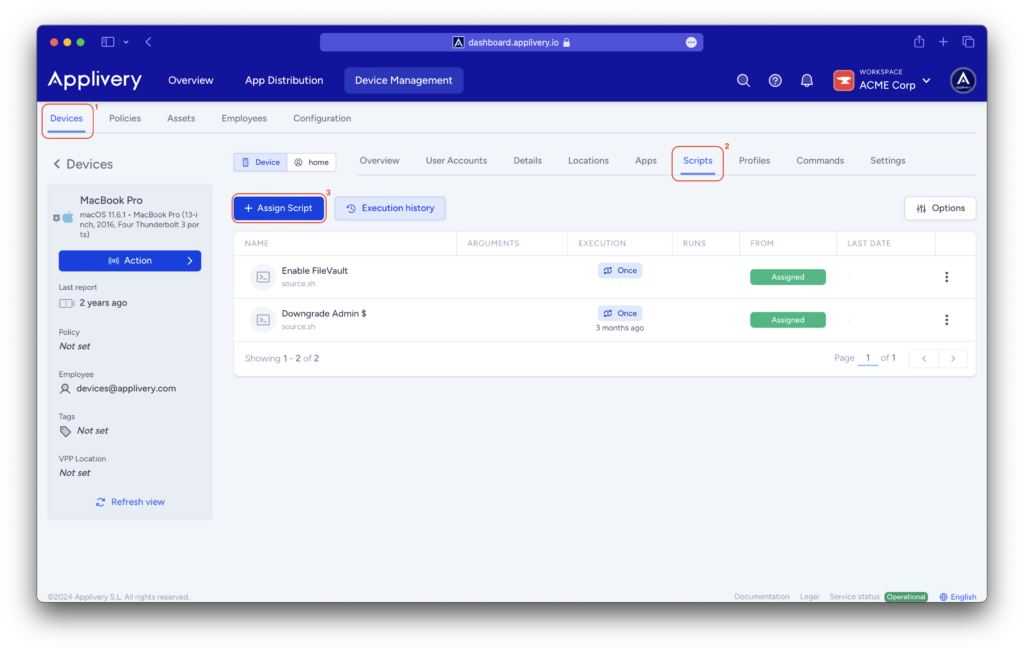
A modal view will appear, allowing you to choose a script from the script section or upload it from your device.
You will also have the option to select the execution method, and add the script’s arguments:
- Once: The script will run once per device. You will also have the option to repeat the execution, even if it has already been executed.
- Loop: The script will run cyclically at the chosen time interval.
- On-demand: The script will never be run automatically and will only be offered as an optional item from Self-Service.
Below, you can find the complete list of mustache tag interpolations for the script arguments. Please note that each argument needs to be separated by double quotation marks (“”):
- “
{{device.id}}“ - “
{{device.displayName}}“ - “
{{device.serialNumber}}“ - “
{{device.osVersion}}“ - “
{{device.chip}}“ - “
{{device.isAppleSilicon}}“ - “
{{device.hostName}}“ - “
{{user.id}}“ - “
{{user.email}}“ - “
{{user.name}}“
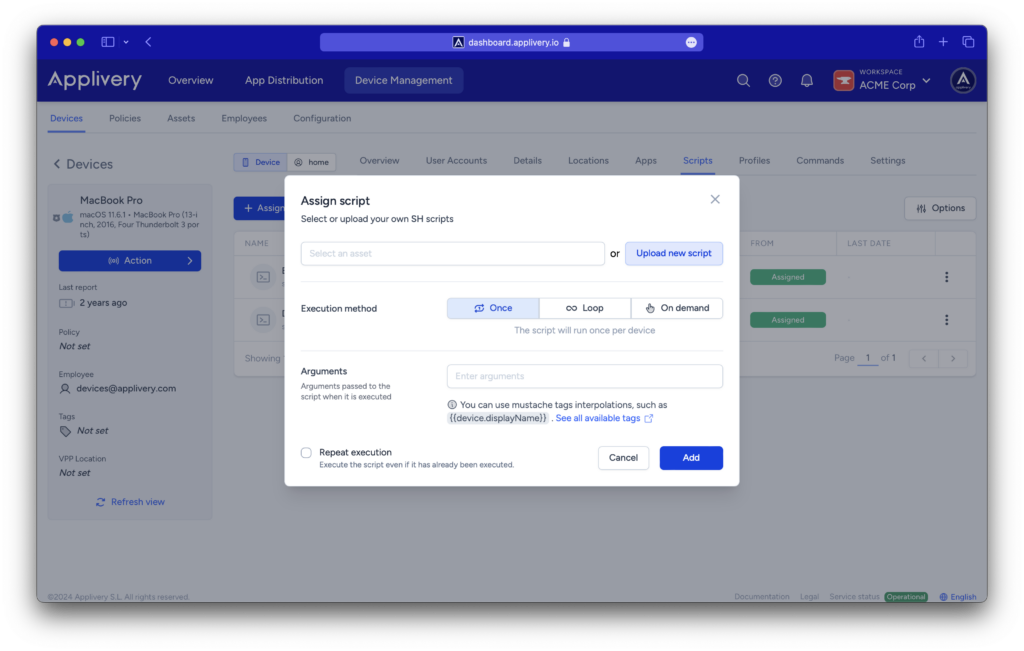
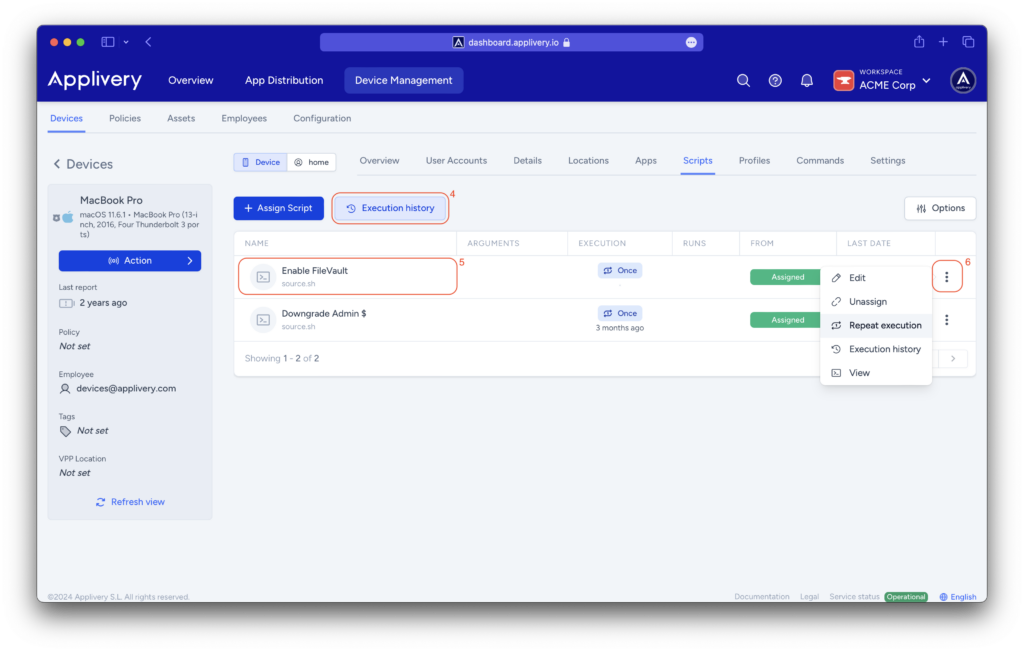
By clicking the Execution history button (4), you can view the execution history of all your scripts.
You can also access the execution history of a specific script by clicking on the script itself (5) or the three vertical dots at the end of the script. Clicking these dots (6) will also display additional actions:
- Edit: Edit the script.
- Unassign: Unassign the script from the device.
- View: View the original script in the asset section.
This ensures that the script will be sent again, regardless of its prior execution history on that device.
Do It Yourself! #
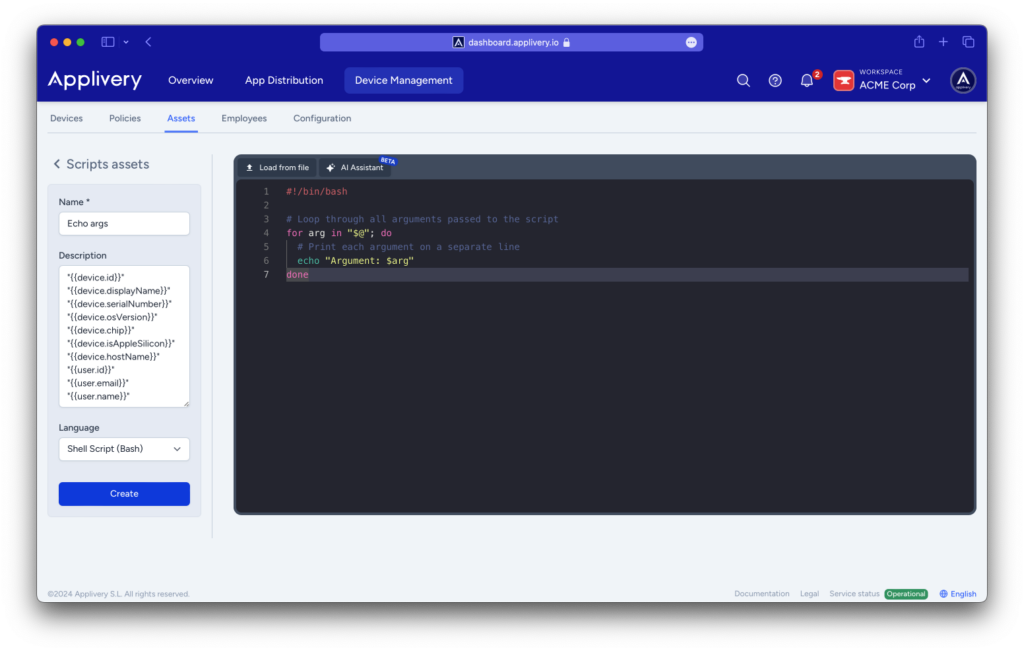
First, create a simple script and include the arguments in the description field. This will help you remember the arguments and ensure you don’t forget them.
Then, you need to add the script to a policy if you want it to be applied to all your devices, or you can assign it to a specific device.
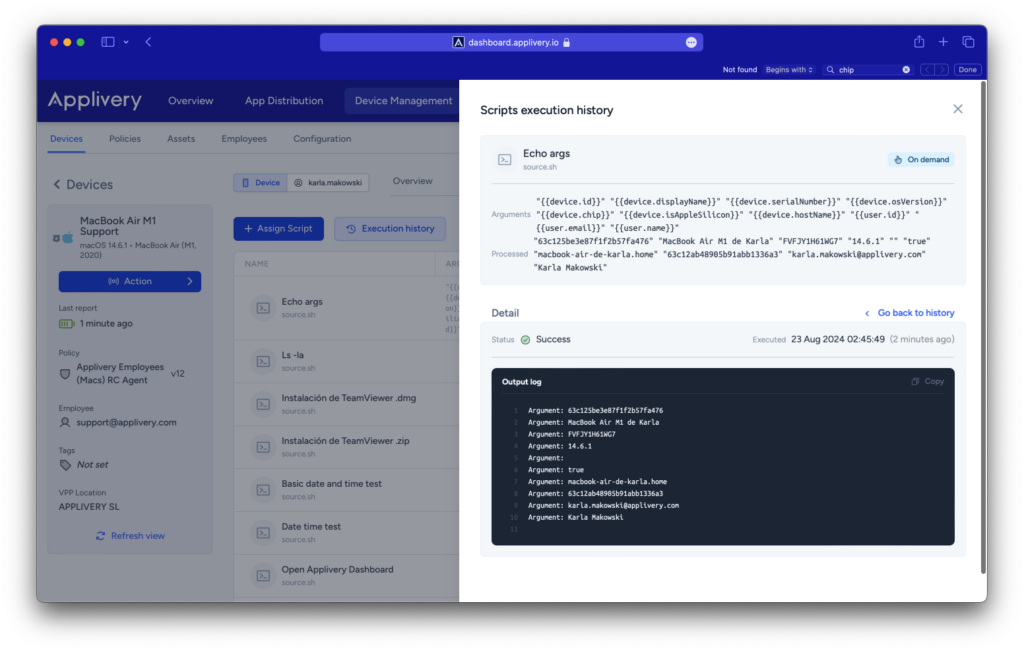
Once you have added the script by selecting the execution method and defining the arguments (don’t forget the double quotation marks!), you can run your script and check its output log in the execution history.
Example scripts #
Rather than writing scripts from scratch, you can locate a script that performs a function similar to what you need and then customize it for your specific requirements. This approach is commonly used by experienced scripters. By finding reliable scripts from trusted sources or reusing ones you’ve created before and modifying them for your current needs, you can save time and gain a better understanding of how scripts operate.
For instance, here are a few scripts that you could modify for common IT tasks on macOS.
Lower user permissions to standard level #
					#!/bin/bash

# Retrieve the username of the currently logged-in user
loggedInUser=$(/usr/sbin/scutil <<< "show State:/Users/ConsoleUser" | awk '/Name :/ && ! /loginwindow/ {print $3}')

# Execute the dseditgroup command to revoke the user's admin privileges
/usr/sbin/dseditgroup -o edit -d "$loggedInUser" -t user admin
Locate App Store category #
					#!/bin/bash

# Iterate through each application in the Applications directory to identify its App Store category
# If the category is "null," the app was not obtained from the App Store

for app in /Applications/*.app; do
   AppCategory=$(/usr/bin/mdls -name kMDItemAppStoreCategory "$app" | awk '{print $3}' | tr -d '"')
   /bin/echo $(/usr/bin/basename $app) has a category of: "$AppCategory"
done
Quit a specific app #
					#!/bin/bash

# Execute killall to close the specific app
/usr/bin/killall "App Store"
Restart the Mac if it has been over a week since the last reboot #
					#!/bin/bash

# Capture the current timestamp in seconds
currentDate=$(/bin/date +%s)

# Retrieve the system's last boot timestamp
bootDate=$(/usr/sbin/sysctl -n kern.boottime | /usr/bin/awk -F'[ ,]' '{print $4}')

# Define the number of seconds in a seven-day period
week=604800

#echo $currentDate
#echo $bootDate
#echo $week

# Calculate the system's uptime by finding the difference between the current timestamp and the boot timestamp
uptime=$(( currentDate - bootDate ))

#echo $uptime

# If the system has been running for a week or more, initiate a reboot with a 60-second delay
if [ $uptime -ge $week ]; then

#echo "You have been booted for longer than a week"
   sudo shutdown -r now --delaySeconds 60
fi